Configuring the Default Settings of the Printer Driver
Configuring the optional environment of this machine
When you use this machine for the first time, properly configure the printer driver so that it contains information such as the options installed in this machine.
-
Open [System Preferences] in the Apple menu, then click the [Print & Fax] icon.
-
In Mac OS X 10.7/10.8, click the [Print & Scan] icon. In Mac OS X 10.9, click the [Printers & Scanners] icon.
-
In Mac OS X 10.2/10.3, select [Macintosh HD] (system hard disk) - [Applications] - [Utilities], then double-click [Printer Setup Utility] or [Print Center] to open it.
-
-
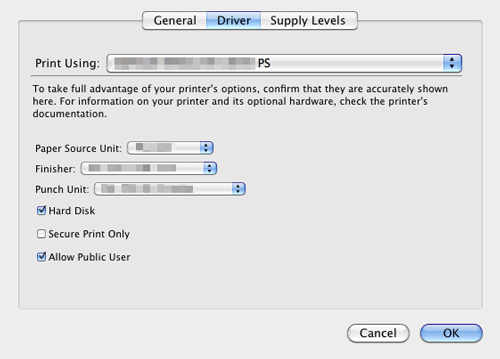
Display the [Printer Information] window.
-
In Mac OS X 10.5/10.6/10.7/10.8/10.9, click [Options & Supplies...]. In Mac OS X 10.4, click the [Printer Setup...] icon.
-
For the [Printer Setup Utility]/[Print Center] window, click [Show Info] of the [Printer] menu.
-
-
Display the [Installable Options] window.
-
In Mac OS X 10.9, click [Driver].
-
In Mac OS X 10.5/10.6/10.7/10.8, click [Driver].
-
In Mac OS X 10.2/10.3/10.4, select [Installable Options].
-
-
Change the settings according to the options installed in this machine.
-
Click [OK] or [Apply Changes] to close the [Printer Information] window.
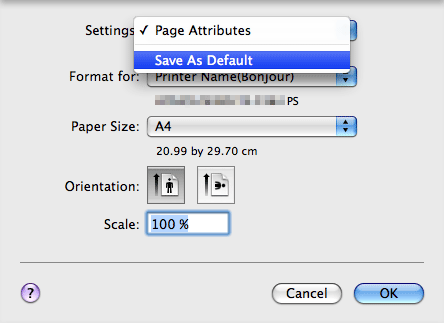
Changing the default print settings
In the [Page Setup] window of the printer driver, you can change the default settings for paper and zoom ratio.
-
Display the [Page Setup] window of the printer driver.
-
For information on how to display the [Page Setup] window, refer to Here.
-
-
Change the settings, and select [Save As Default] from [Settings:].