
Setting Up the Computer
Preparing the printer driver
Preparing the printer driver CD-ROM
For the CD-ROM, contact the administrator of this machine.
Checking the operating systems supported by the printer driver
Check that your computer meets the operating environment requirements of the printer driver.
Installing the printer driver to the computer
Installing the printer driver using the installer
Insert the "Driver & Utilities CD-ROM Vol.2" disk into the drive, and install the software by following the on-screen instructions.
Adding the printer
Add the printer automatically detected by Bonjour to the computer.
Preparation finished
Preparing the printer driver CD-ROM
The following CD-ROMs are supplied with this machine:
|
CD-ROM |
Description |
|---|---|
|
Driver & Utilities CD-ROM Vol.1 |
Contains the printer driver (PCL/PS/FAX) for Windows and screen fonts. This also contains the page for downloading utility software. |
|
Driver & Utilities CD-ROM Vol.2 |
Contains the printer driver (XPS) for Windows, the printer driver for the Mac OS, screen fonts, and the TWAIN driver. This also contains the page for downloading utility software. |
|
User's Guide CD-ROM |
Contains the User's Guide. |

-
In User's Guide manuals, location paths of folders or files may not contain the root directory.
Checking the operating systems supported by the printer driver
The following lists the printer drivers included on the CD-ROMs supplied with this machine and the supported operating systems.
|
Printer driver |
Page description language |
Supported Operating Systems |
|---|---|---|
|
PostScript PPD driver (PS-PPD) |
PostScript 3 Emulation |
Mac OS 9.2 or later Mac OS X 10.2.8/10.3/10.4/10.5/10.6/10.7/10.8/10.9 |
Installing the printer driver
Install the printer driver using the installer.
-
Before installation, exit all application software programs that are running.
-
Mount the "Driver & Utilities CD-ROM Vol.2" disk into the CD-ROM drive of the computer.
-
Open the folder on the CD-ROM that contains the desired printer driver.
-
Select the folder according to the printer driver, operating system, and language to be used.
-
-
Copy the driver file onto the desktop according to the Mac OS X version.
-
Mac OS X 10.2: bizhub_C754_102.pkg
-
Mac OS X 10.3: bizhub_C754_103104.pkg
-
Mac OS X 10.4: bizhub_C754_103104.pkg
-
Mac OS X 10.5: bizhub_C754_105.pkg
-
Mac OS X 10.6: bizhub_C754_106.pkg
-
Mac OS X 10.7: bizhub_C754_107.pkg
-
Mac OS X 10.8: bizhub_C754_108.pkg
-
Mac OS X 10.9: bizhub_C754_109.pkg
-
In Mac OS X 10.5/10.6/10.7/10.8/10.9, the driver folder varies depending on the required paper size. Select the file according to your environment.
To mainly use the metric-based paper size such as A4 size: "WW_A4" folder
To mainly use the inch-based paper size such as letter size or 8 1/2 11: "WW_Letter" folder
-
-
Double-click the file copied onto the desktop.
The printer driver installer starts.
-
Click [Continue] following the instructions on the pages that follow until the [Install] page appears.
-
When the name and password prompt appears during the procedure, enter the administrator name and password.
-
-
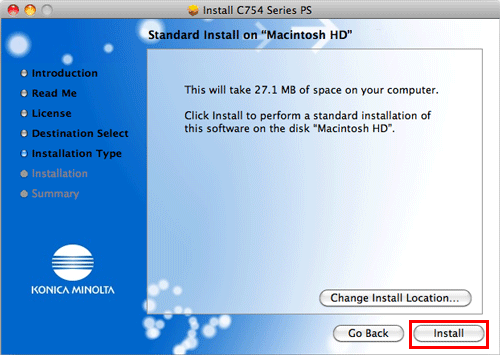
Click [Install].
The printer driver is installed in the computer.
-
Click [Close].
This completes the installation process of the printer driver. Then, add the printer to the computer.
Configuring connection using Bonjour (Mac OS X 10.4/10.5/10.6/10.7/10.8/10.9)
Add the printer automatically detected by Bonjour to the computer.
-
Select [System Preferences...] in the Apple menu.
-
Click the [Print & Fax] icon.
-
In Mac OS X 10.7/10.8, click the [Print & Scan] icon. In Mac OS X 10.9, click the [Printers & Scanners] icon.
-
-
Click [+] in the lower left of the screen.
-
In Mac OS X 10.4/10.5/10.6, go to Step 4.
-
In Mac OS X 10.7/10.8/10.9, if a target printer name is found in the list displayed by clicking [+], select it. When a printer driver is selected automatically, the printer addition is completed. If a target printer name is not found, select [Add Other Printer or Scanner...] or [Add Printer or Scanner...], and go to Step 4.
-
-
Click [Default].
Connected printers are detected.
-
If no printers are detected, restart this machine.
-
-
From the [Printer Name] list, select the desired printer for a Bonjour connection.
-
To check the printer name, select [Utility] - [Administrator Settings] - [Network Settings] - [Bonjour Setting] on this machine.
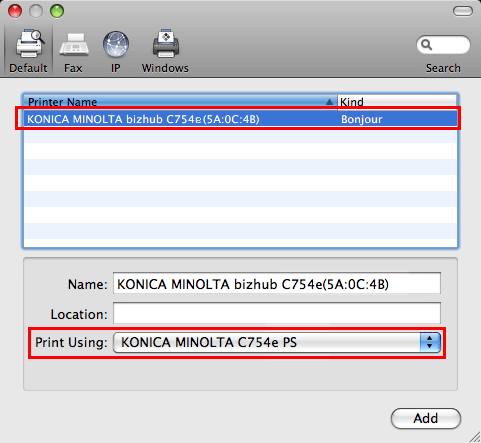
The printer driver for the selected printer is displayed in [Print Using:].
-
When the printer driver is displayed, go to Step 7.
-
When the printer driver is not correctly displayed, go to Step 6.
-
-
Manually select the printer driver.
-
In Mac OS X 10.9, select [Select Software...] from [Print Using:], then click the driver of the desired printer from the list that is displayed in another window.
-
In Mac OS X 10.6/10.7/10.8, select [Select Printer Software...] from [Print Using:], then click the driver of the desired printer from the list that is displayed in another window.
-
In Mac OS X 10.5, select [Select a driver to use...] in [Print Using:], then click the driver of the desired printer from the list.
-
In Mac OS X 10.4, select [KONICA MINOLTA] in [Print Using:], and then click the driver of the desired printer from the list.
-
-
Click [Add].
This completes the addition process of the printer. Then, proceed to the [Installable Options] window to configure the optional environment for this machine. For details, refer to Here.
Configuring connection using Rendezvous (Mac OS X 10.2/10.3)
Add the printer automatically detected by Rendezvous to the PC.
-
From [Macintosh HD] (system hard disk) - [Applications] - [Utilities], double-click [Printer Setup Utility] or [Print Center] to open it.
-
When the [You have no printers available.] window appears, click [Add]. When the [Printer List] appears, click [Add].
-
If available printers have already been specified, the [You have no printers available.] window does not appear.
-
-
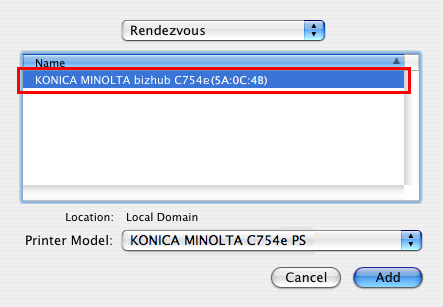
Select [Rendezvous] as the connection method.
Connected printers are detected.
-
If no printers are detected, restart this machine.
-
-
From the [Name] list, select the desired printer for Rendezvous connection.
-
To check the printer name, select [Utility] - [Administrator Settings] - [Network Settings] - [Bonjour Setting] on this machine.
-
-
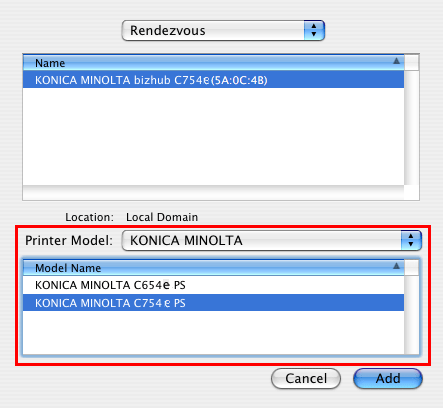
Manually select the printer driver.
-
In [Printer Model:], select [KONICA MINOLTA], then click the driver of the desired printer from the model list.
-
-
Click [Add].
This completes the addition process of the printer. Then, proceed to the [Installable Options] window to configure the optional environment for this machine. For details, refer to Here.