
Installation Using a SMB Connection
Operations required to use this function (For administrators)
Configure the SMB operating environment.
How to configure the setting is explained using Web Connection. For details, refer to Here.
In Windows 8/8.1/Server 2012/Server 2012 R2
You can install the printer driver by automatically detecting the printer on the network or by creating a new port.
-
Administrator privileges are required to perform this task.
-
Since the printer is searched for during the installation, be sure to connect this machine to the network before turning it on.
-
Insert the printer driver CD-ROM into the CD-ROM drive of the computer.
-
Display the printer window.
-
In Windows 8.1, click [
 ] in the Start window, then click [Control Panel] - [Hardware and Sound] - [View devices and
printers].
] in the Start window, then click [Control Panel] - [Hardware and Sound] - [View devices and
printers].
-
In Windows 8, right-click the Start window, then click [All apps] - [Control Panel] - [Hardware and Sound] - [View devices and printers].
-
In Windows Server 2012/Server 2012 R2, open the Start window, then click [Control Panel] - [Hardware] - [View devices and printers].
-
-
Select Add a printer.
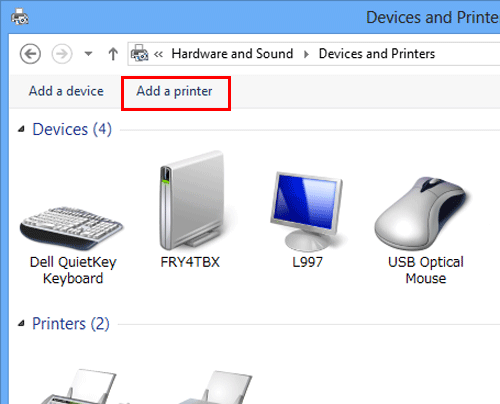
The [Add Printer] Wizard appears.
-
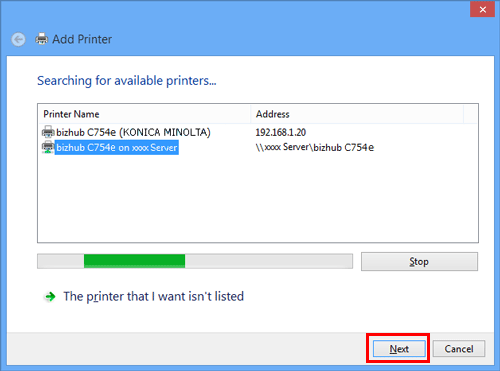
Select your machine from the list, then click [Next].
-
If no printers are detected, restart this machine.
-
Select a printer from "\\NetBIOS-name\print-service-name".
To check the NetBIOS name and print service name, select [Utility] - [Administrator Settings] - [Network Settings] - [SMB Settings] - [SMB Server Settings] - [SMB Print Setting] on this machine. -
It may take some time to finish searching the entire list of printers.
-
-
Click [OK].
-
Click [Have Disk...].
-
Click [Browse...].
-
Select the folder on the CD-ROM containing the desired printer driver, then click [Open].
-
Select the folder according to the printer driver, operating system, and language to be used.
Selectable printer drivers: PCL driver, PS driver, and XPS driver
-
-
Click [OK].
The [Printers] list appears.
-
Click [Next].

-
Follow the instructions on the pages that follow.
-
If the [User Account Control] window appears, click [Continue] or [Yes].
-
-
Click [Finish].
-
After finishing the installation, make sure that the icon for the installed printer is displayed in the [Devices and Printers] window.
-
Remove the CD-ROM from the CD-ROM drive.
This completes the installation process of the printer driver.
The procedure for installing the printer driver by creating a new port is as follows:
-
Administrator privileges are required to perform this task.
-
Since the printer is searched for during the installation, be sure to connect this machine to the network before turning it on.
-
Insert the printer driver CD-ROM into the CD-ROM drive of the computer.
-
Display the printer window.
-
In Windows 8.1, click [
] in the Start window, then click [Control Panel] - [Hardware and Sound] - [View devices and
printers].
-
In Windows 8, right-click the Start window, then click [All apps] - [Control Panel] - [Hardware and Sound] - [View devices and printers].
-
In Windows Server 2012/Server 2012 R2, open the Start window, then click [Control Panel] - [Hardware] - [View devices and printers].
-
-
Select Add a printer.
-
In the window showing the detected printer, click [The printer that I want isn't listed].
-
Click [Add a local printer or network printer with manual settings].
-
Click [Create a new port:], then select [Local Port].
-
Click [Next].
-
Specify the IP address and port.
-
Enter "\\NetBIOS-name\print-service-name" in the [Port Name] box.
-
To enter the NetBIOS name and print service name, select [Utility] - [Administrator Settings] - [Network Settings] - [SMB Settings] - [SMB Server Settings] - [SMB Print Setting] on this machine.
-
-
Click [OK].
-
Click [Have Disk...].
-
Click [Browse...].
-
Select the folder on the CD-ROM containing the desired printer driver, then click [Open].
-
Select the folder according to the printer driver, operating system, and language to be used.
Selectable printer drivers: PCL driver, PS driver, and XPS driver
-
-
Click [OK].
The [Printers] list appears.
-
Click [Next].

-
Follow the instructions on the pages that follow.
-
If the [User Account Control] window appears, click [Continue] or [Yes].
-
-
Click [Finish].
-
After finishing the installation, make sure that the icon for the installed printer is displayed in the [Devices and Printers] window.
-
Remove the CD-ROM from the CD-ROM drive.
This completes the installation process of the printer driver.
In Windows Vista/7/Server 2008/Server 2008 R2
You can install the printer driver by automatically detecting the printer on the network or by creating a new port.
The procedure for installing the printer driver by automatically detecting the printer on the network is as follows:
-
Administrator privileges are required to perform this task.
-
Since the printer is searched for during the installation, be sure to connect this machine to the network before turning it on.
-
Insert the printer driver CD-ROM into the CD-ROM drive of the computer.
-
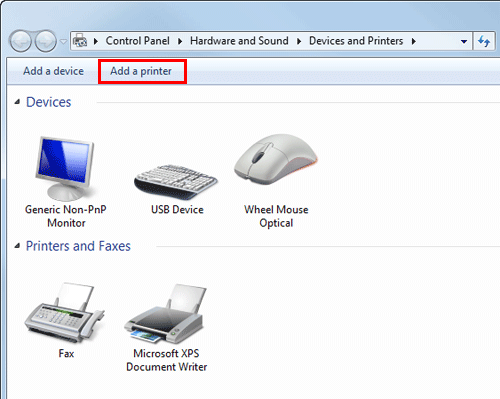
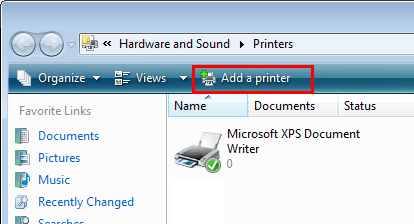
Display the printer window.
-
If the Windows 7 or Windows Server 2008 Revision 2 is running, select [Devices and Printers] from the Start menu.
If [Devices and Printers] is not displayed, select [Control Panel] - [Hardware and Sound], and click [View devices and printers]. When [Control Panel] is displayed in an icon view, double-click [Devices and Printers]. -
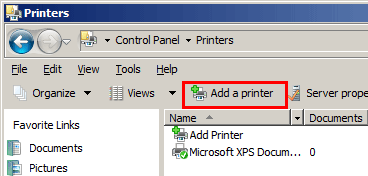
In Windows Vista/Server 2008, click [Control Panel] - [Hardware and Sound] - [Printers] from the Start menu. When [Control Panel] is displayed in Classic View, double-click [Printers].
-
-
Select Add a printer.
-
In Windows 7/Server 2008 R2, click [Add a printer].
-
In Windows Vista/Server 2008, click [Add a printer].
In Windows Vista:
In Windows Server 2008:
The [Add Printer] Wizard appears.
-
-
Click [Add a network, wireless or Bluetooth printer].
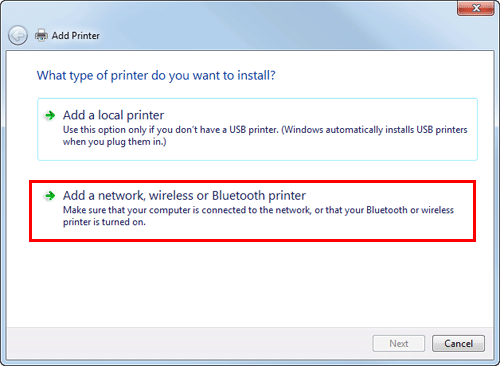
Connected printers are detected.
-
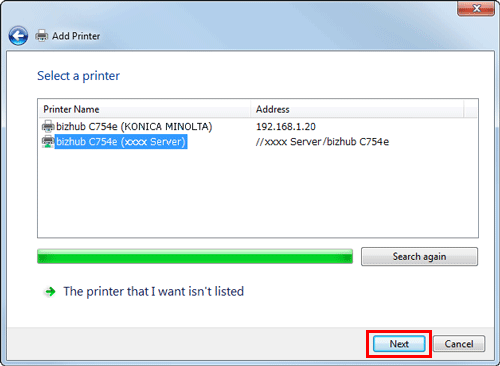
Select your machine from the list, then click [Next].
-
If no printers are detected, restart this machine.
-
Select a printer from "\\NetBIOS-name\print-service-name".
To check the NetBIOS name and print service name, select [Utility] - [Administrator Settings] - [Network Settings] - [SMB Settings] - [SMB Server Settings] - [SMB Print Setting] on this machine.
-
It may take some time to finish searching the entire list of printers.
-
-
Click [OK].
-
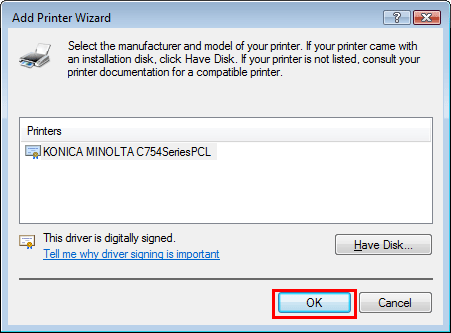
Click [Have Disk...].
-
Click [Browse...].
-
Select the folder on the CD-ROM containing the desired printer driver, then click [Open].
-
Select the folder according to the printer driver, operating system, and language to be used.
Selectable printer drivers: PCL driver, PS driver, and XPS driver
-
-
Click [OK].
The [Printers] list appears.
-
Click [OK].
-
Follow the instructions on the pages that follow.
-
If the [User Account Control] window appears, click [Continue] or [Yes].
-
-
Click [Finish].
-
After finishing the installation, make sure that the icon for the installed printer is displayed in the [Printers] or [Devices and Printers] window.
-
Remove the CD-ROM from the CD-ROM drive.
This completes the installation process of the printer driver.
The procedure for installing the printer driver by creating a new port is as follows:
-
Administrator privileges are required to perform this task.
-
Since the printer is searched for during the installation, be sure to connect this machine to the network before turning it on.
-
Insert the printer driver CD-ROM into the CD-ROM drive of the computer.
-
Display the printer window.
-
If the Windows 7 or Windows Server 2008 Revision 2 is running, select [Devices and Printers] from the Start menu.
If [Devices and Printers] is not displayed, select [Control Panel] - [Hardware and Sound], and click [View devices and printers]. When [Control Panel] is displayed in an icon view, double-click [Devices and Printers]. -
In Windows Vista/Server 2008, click [Control Panel] - [Hardware and Sound] - [Printers] from the Start menu. When [Control Panel] is displayed in Classic View, double-click [Printers].
-
-
Select Add a printer.
-
In Windows 7/Server 2008 R2, click [Add a printer].
-
In Windows Vista/Server 2008, click [Add a printer].
In Windows Vista:
In Windows Server 2008:
[Add printer] appears.
-
-
Click [Add a local printer].
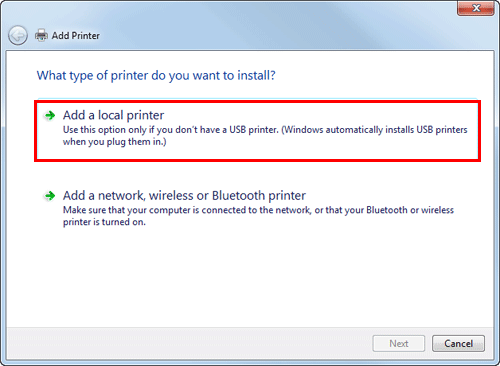
The [Choose a printer port] dialog box appears.
-
Click [Create a new port:], then select [Local Port].
-
Click [Next].
-
Specify the IP address and port.
-
Enter "\\NetBIOS-name\print-service-name" in the [Port Name] box.
-
To enter the NetBIOS name and print service name, select [Utility] - [Administrator Settings] - [Network Settings] - [SMB Settings] - [SMB Server Settings] - [SMB Print Setting] on this machine.
-
-
Click [Next].
-
If the [Additional Port Information Required] dialog box appears, go to Step 9.
-
If the [Install the printer driver] dialog box appears, go to Step 12.
-
-
Select the [Custom] check box, then click [Settings...].
-
Change the settings according to the port, and then click [OK].
-
Click [Next] or [OK].
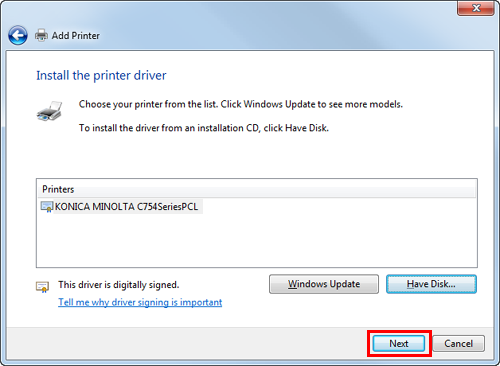
The [Install the printer driver] dialog box appears.
-
Click [Have Disk...].
-
Click [Browse...].
-
Select a desired printer driver folder in the CD-ROM, and then click [Open].
-
Select the folder according to the printer driver, operating system, and language to be used.
Selectable printer drivers: PCL driver, PS driver, and XPS driver
-
-
Click [OK].
The [Printers] list appears.
-
Click [Next].
-
Follow the instructions on the pages that follow.
-
If the [User Account Control] window appears, click [Continue] or [Yes].
-
-
Click [Finish].
-
After finishing the installation, make sure that the icon for the installed printer is displayed in the [Printers] or [Devices and Printers] window.
-
Remove the CD-ROM from the CD-ROM drive.
This completes the installation process of the printer driver.
In Windows XP/Windows 2003
-
Administrator privileges are required to perform this task.
-
Insert the printer driver CD-ROM into the CD-ROM drive of the computer.
-
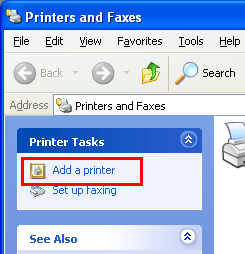
From the Start menu, click [Printers and Faxes].
-
If [Printers and Faxes] is not displayed, select [Control Panel] - [Printers and Other Hardware] - [Printers and Faxes] from the Start menu.
-
-
Select Printer Install.
-
In Windows XP, select [Add a printer] from [Printer Tasks].
-
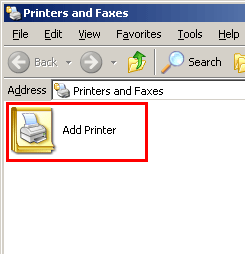
In Windows Server 2003, double-click [Add Printer].
[Add Printer Wizard] appears.
-
-
Click [Next >].
-
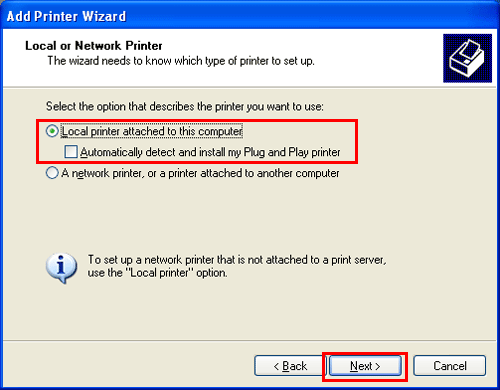
Select [Local printer attached to this computer], then click [Next >].
-
Clear the [Automatically detect and install my Plug and Play printer] check box.
The dialog box for [Select a Printer Port] appears.
-
-
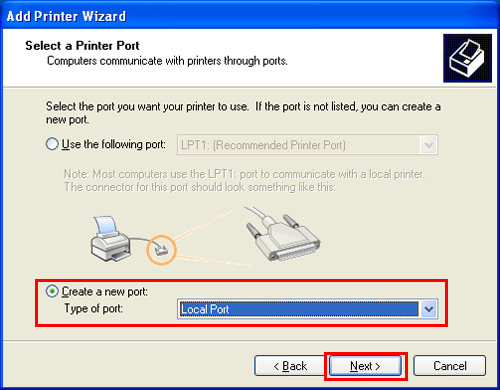
Click [Create a new port:], select [Local Port] as the [Type of port:], then click [Next >].
-
Enter "\\NetBIOS-name\print-service-name" in the [Port Name] box.
-
To enter the NetBIOS name and print service name, select [Utility] - [Administrator Settings] - [Network Settings] - [SMB Settings] - [SMB Server Settings] - [SMB Print Setting] on this machine.
-
-
Click [OK].
[Add Printer Wizard] appears.
-
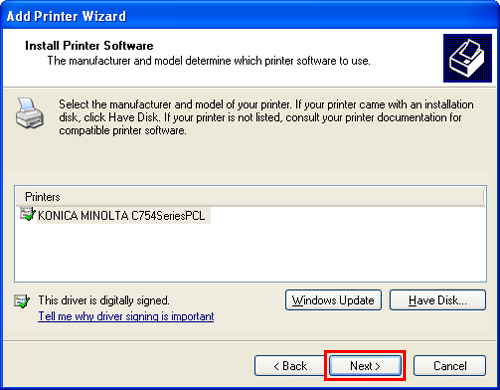
Click [Have Disk...].
-
Click [Browse...].
-
Select the folder on the CD-ROM containing the desired printer driver, then click [Open].
-
Select the folder according to the printer driver, operating system, and language to be used.
Selectable printer drivers: PCL driver and PS driver
-
-
Click [OK].
The [Printers] list appears.
-
Click [Next >].
-
Follow the instructions on the pages that follow.
-
To use a network connection, perform a test print after the network settings have been configured.
-
-
Click [Finish].
-
After finishing the installation, make sure that the icon for the installed printer is displayed in the [Printers and Faxes] window.
-
Remove the CD-ROM from the CD-ROM drive.
This completes the installation process of the printer driver.