
[Properties] Window of the Printer Driver
How to display the [Properties] window
The printer driver has two windows for configuring settings: the [Properties] window and the [Printing Preferences] window. This section describes the [Properties] window.
In the [Properties] window, you can configure settings for the optional environment of this machine or Windows functions. To display the [Properties] window, take the following steps:
-
Display the printer window.
-
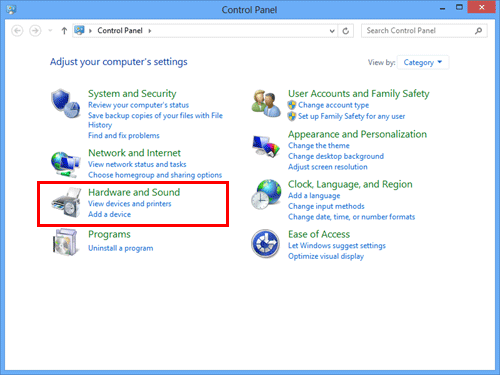
In Windows 8.1, click [
 ] in the Start window, then click [Control Panel] - [Hardware and Sound] - [View devices and
printers].
] in the Start window, then click [Control Panel] - [Hardware and Sound] - [View devices and
printers].
-
In Windows 8, right-click the Start window, then click [All apps] - [Control Panel] - [Hardware and Sound] - [View devices and printers].
-
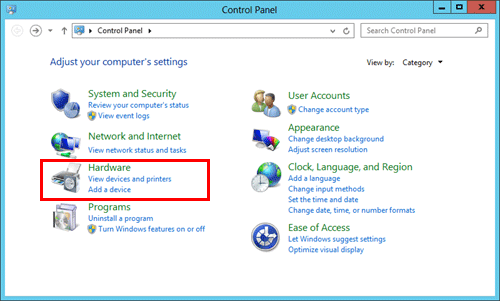
In Windows Server 2012/Server 2012 R2, open the Start window, then click [Control Panel] - [Hardware] - [View devices and printers].
-
In Windows 7/Server 2008 R2, click [Devices and Printers] from the Start menu.
If [Devices and Printers] is not displayed, select [Control Panel] - [Hardware and Sound], and click [View devices and printers].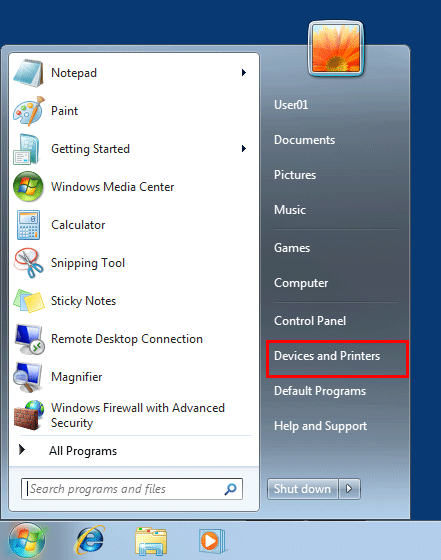
-
In Windows Vista/Server 2008, click [Control Panel] - [Hardware and Sound] - [Printers] from the Start menu.
When [Control Panel] is displayed in Classic View, double-click [Printers].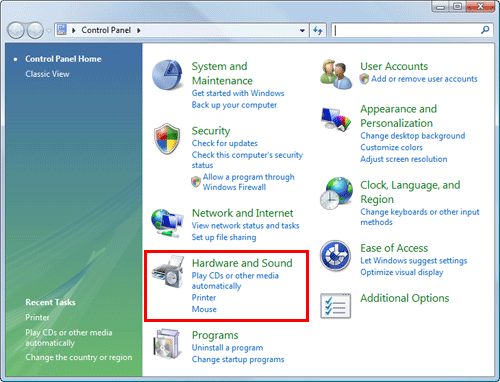
-
In Windows XP/Server 2003, open the Start menu, then click[Printers and Faxes].
If [Printers and Faxes] is not displayed, select [Control Panel] - [Printers and Other Hardware] - [Printers and Faxes]. When [Control Panel] is displayed in Classic View, double-click [Printers].
-
-
Open the printer properties.
-
In Windows 7/8/8.1/Server 2008 R2/Server 2012/Server 2012 R2, right-click the icon of the installed printer, and from [Printer Properties], click the displayed printer name.

-
In Windows XP/Vista/Server 2003/Server 2008, right-click the icon of the installed printer, then click [Properties].
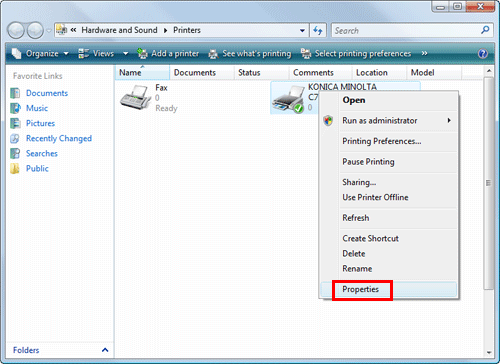
The [Properties] screen appears.
-
Tabs provided by Windows
The [General], [Sharing], [Port], [Advanced], [Color Management], and [Security] tabs are provided by Windows.
You can print a test page, configure printer sharing, configure printer ports, etc. For details, refer to the Windows manuals.